We have a room in our house that wasn’t used much. We called it our sunroom. It’s a cute room that gets a lot of light, but without a TV in there, let’s face it–it usually only got some use when I hid from the kids in there when I was on the phone. So, as our girls are getting older, we decided to repurpose that room. We cleared out all the furniture and shipped it to my parents so they can do their own repurposing up north! (Side note: my parents were thrilled… in classic style as usual, my mom also asked if I could “throw in any lamps lying around” and my dad was wondering–tongue in cheek–if he could also have the new leather chair in front of our fireplace?! They like to joke about how most parents give their children home furnishings they no longer need… my highly-practical parents always say they are the ones benefitting from their children’s overhauls! Ha!)
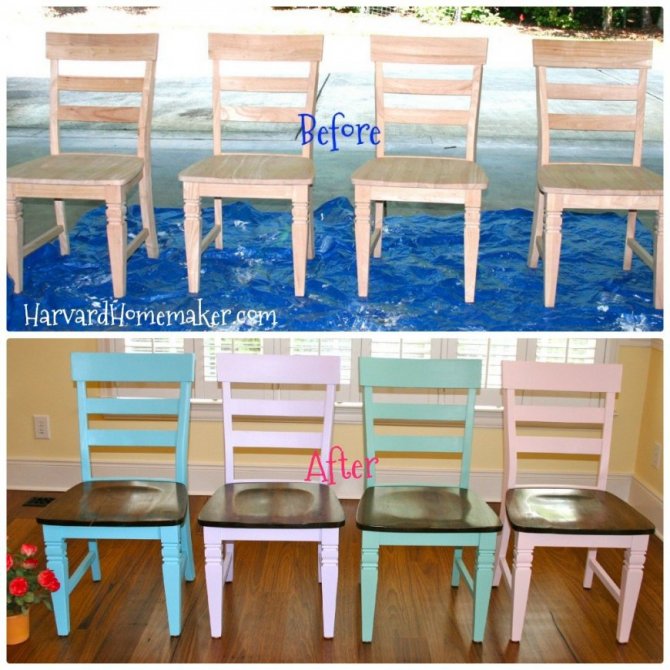
With the sunroom empty, we are waiting upon the arrival of four desks so we can now have a place for our girls to do their homework and study over the years. The desks will all be identical, so we decided to mix things up by making each chair different. We found some unfinished chairs, and the girls and I decided to finish them ourselves. Did we have any idea what we were doing? Nope. And since I let my kids paint, there are some drips here and there that I probably should have taken the time to sand out (but I didn’t). And we used the leftover paint we already had on hand from recently painting their bedrooms. Was that the right type of paint to use? No idea. Probably not. But they each wanted their chair to be the color of their bedroom, and I thought that sounded like a fabulous idea! And who wants to buy more paint?
Even after all that, the chairs turned out really cute! I even like the imperfections and drips–they will always remind me of the weekend my girls and I painted their chairs when they were young. They were so proud, and they had so much fun working together. And somewhere along the way, I’d like to think that I taught them a few life lessons: 1) not everything has to come finished from a store; 2) if you make a mistake, no big deal (just try again and paint over it); 3) never be afraid to try new things; 4) you can save a little money by doing things yourself; and 5) (my favorite) girls can handle tools and a paintbrush too!!!
So give it a try and attempt a project you’ve been considering! Chances are it will turn out just fine, and you might even make some memories along the way…

We started by sanding the chairs lightly, dusting the debris off with tack cloth (see below picture), and then priming. We used a can of paint we found in our garage left from recent renovations–it said “primer” on it, and that was good enough for us. Turns out it was a grayish-green color, but that didn’t seem to matter.

Meanwhile, I removed the seats and sanded them (in the direction of the grain). I then dusted them with tack cloth (a somewhat sticky cloth–see the yellow bag it came in below) to remove all fine particles. Using an old dish towel, I stained each seat evenly with Dark Walnut stain, and set them aside to dry.

See below for a picture of the tack cloth and the bag it came in.

After the chairs were dry, we did some sanding to remove drips. This probably could have been more thorough on our part, but we weren’t striving for perfection. :) After dusting the chairs again, we then applied the paint. One coat was enough, with the exception of the pink chair. It took two coats to completely cover the primer.

After about 6 hours, I did apply another coat of stain (this is optional). The next day it was time to apply a top coat (polyurethane) to the seats. I used a fine sandpaper (220 grit) and then used the tack cloth thoroughly to ensure that all debris had been removed. After letting the seats dry on an old towel when I stained them, I realized that little fibers were sticking to the edges of the seat. So I got smart this time around, and I placed the seats up on paint cans as I applied the top coat so they could dry without touching anything. I learned that it worked best to start in the center of the seat and drag the brush out to the edges–this minimized a lot of dripping down the sides. I also traced the edges of the seat with the brush to ensure that the top coat was evenly applied all the way around as well.
Once this was dry (3-4 hours at least), I sanded yet one more time and used the tack cloth. I then applied one final coat in the same way I described above.


And that’s it! I just had to screw the seats back on once the paint was dry, and there you have it: four pretty cute chairs for four pretty cute girls if we do say so ourselves!
I have a few more projects up my sleeve for this new room, so stay tuned. We plan to use more of each daughter’s “signature color” to tie everything together. Have any ideas for me? :)
If you’d like to keep up with me and my blog (I’d love that!), please follow along via Facebook, Pinterest, Twitter, Instagram, Google+, or you can sign up for my monthly newsletter in the footer of my site! :)

P.S. These are the Sherwin-Williams paint colors we used:
Rapture Blue
Potentially Purple
Spearmint
Teaberry


Lovely Chairs! I have a similar project on my website http://www.HotDishHomemaker.com It is so rewarding to repurpose items and make them useful again! It really isn’t that hard and you end up with a custom piece that you can be proud of. Great work!
Did you have problems with the stain rubbing off on bottoms when people sit in the chairs?
No, not at all! :)