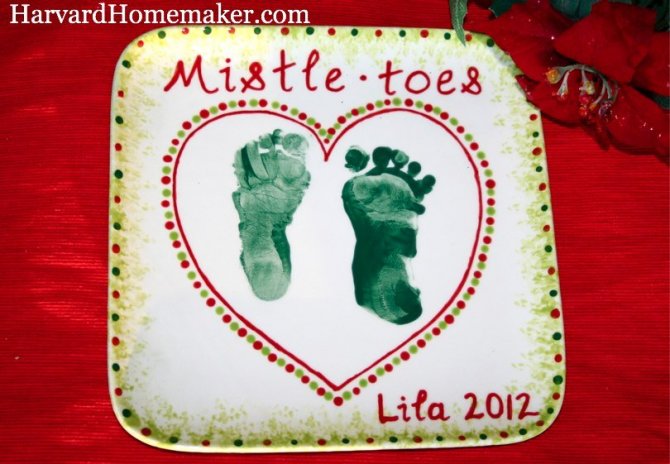
My youngest daughter is celebrating her first Christmas this year. (That’s her sitting in the wreath… we think she’s pretty cute!) I am big on “moments”, so I’m always worried about making sure I capture them before they pass us by! To help get a little snapshot in time this holiday season, I made this plate with her footprints. It’s not perfect, but I still love it. I know we’ll use it around the holidays for years to come, and it will always remind us of this very special time when we celebrated our first Christmas as a family of six thanks to the arrival of this sweet baby girl. And then someday this plate will be hers to use around the holidays. I hope it will help her know how much she’s always been loved from the very beginning of her days…

I went to one of those paint-your-own-pottery places to make this. (I love those places!!!)

To start, they told me I could use a washable marker to write the words. I could then paint over the marker–it would burn off in the kiln. Just make sure you use a different color (I used yellow) than the paint–otherwise it’s hard to tell what is paint and what is marker, and you’d hate to fire the piece and realize a letter is missing because you forgot to paint over the marker!
I’m a big fan of using the back of my paintbrush. Just dip the wooden end into paint and put a little dot on the piece–perfect dots every time!

I wrote the words and put the dots around the edges at the pottery place, but then they let me take some paint home so I could stamp my baby’s feet there. That step could have gone better!! She wasn’t thrilled, and she kicked a bit which splattered dark green paint on the edge of the plate. Oh well. The messy footprints tell the story of how squirmy she is right now–and how she often has a mind of her own. (See, if you look hard enough, there is always a positive!!) :) Since the dark green paint wouldn’t really come off where it splattered, I sponged the kiwi green color over the edges to hide the mistake–but I think it actually looks better that way anyhow!
I also decided to add a heart around her feet to fill in the plate a bit more… once again, I drew a heart with yellow washable marker and then painted over it. (Make sure you use the really crappy markers!! The people at the pottery place said that the nice markers don’t fire off in the kiln!) After I painted the heart, I added more dots around the edge of it with the back of the paintbrush to tie in more of the kiwi color.

On the back I wrote a dedication to my daughter. I used a writing pencil they had on hand that won’t fire off in the kiln. They are a bit hard to write with, so I would recommend writing as large as possible to make sure you can read it.

To make a heart, use the wooden end of the paintbrush and make two dots–then pull the paint from the dots down and in to make a heart. Easy!

Ta-da! A little memory sitting right in front of me–love it! And I hope my daughter will, too, someday… One last tip: I never intended for the plate to look exactly like this. I didn’t plan on the heart, for example. You definitely want to think ahead a little bit before you start painting, but sometimes it’s good to let the piece evolve, too. Just go for it and don’t worry about “perfection”!


Happy Holidays everybody!
What fun ways have you captured moments in time like this? I’d love to hear what you did!